|
|
|
|
|
|
|
ZODIAC MODELS Four-Seat
Building & Flying in Seven Days!
Follow us: POPULAR MECHANICS
|
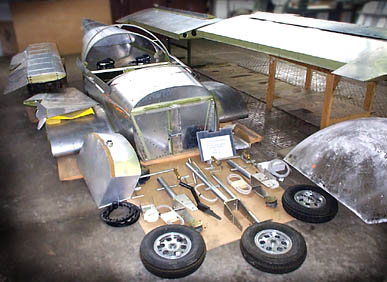
Now that all the major airframe parts have been assembled, all the parts must be joined together to finish the airframe. The landing gear, controls, fuel system and canopy must be assembled and installed, as well as the engine and instruments.
Standard hydraulic disk brakes provide effective braking for the large 8-inch wheels.
The main landing gear slides in a bottom welded steel assembly bolted to the center wing section and a top gear plate. The gear strut / bungee installation is positioned in the gear box, and the wheel is bolted to the fork and gear strut.
The nosewheel assembly is bolted to the firewall assembly with the bungee shock absorber. Pushrods are bolted to the nosewheel strut and are connected directly to the rudder pedals.
All ZODIAC models may be built either with tricycle or tail-dragger gear configurations. The gear system is designed for maximum durability and simplicity, making it suitable for grass field operation and minimizing maintenance requirements.
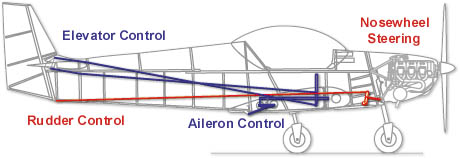
Rudder pedal and control stick assemblies are provided factory-welded in the kit, ready for installation. The rudder pedal assembly is bolted to the floor, with cables connecting the pedals to the rudder (tail) and steel rods connecting directly to the nose gear assembly on the front side of the firewall.
Cables are bolted to the center stick assembly and run to the back of the rear fuselage and are connected to the elevator for elevator control. The main center stick is bolted to a steel torque tube for the aileron control. Two cables travel out to the ends of the center wing section to the aileron control bellcrank. The aileron control bellcrank is connected to a threaded pushrod which connects to the aileron on the outer wing panel.
The standard welded-aluminum fuel tank holds 16 US gallons, and is positioned between the instrument panel and firewall. A sight gauge along the panel provides very accurate fuel quantity readings.
Additional wing tanks may be added in the wing baggage lockers (7.5 gallons each), with fuel electrically pumped to the main tank. The 16 gallon main tank can also be substituted with a smaller 8 gallon tank to provide extensive clearance behind the instrument panel to accommodate larger custom avionics. The tanks are installed with aluminum straps to the airframe. New optional leading-edge wing tanks may also me used in lieu of the standard wing tank option and/or the header fuel tank. The new ZODIAC XL uses new leading edge wing tanks for its standard configuration.
The canopy consists of a bubble plexiglass canopy (the standard canopy is tinted) which is screwed to an aluminum tube frame (the tubes are supplied pre-formed). A welded steel latching mechanism is riveted to both side of the cabin to latch and hold the canopy into place. Click here for additional details on the cabin and canopy. The ZODIAC XL uses a new canopy hinging system, with the canopy hinging forward, instead of sideways.
Once the airframe is completed, the builder is ready for engine and instruments installation, and for final finishing (painting, upholstery, etc.).
The standard Rotax 912 engine can be purchased from Zenith Aircraft Company as a full firewall-forward package, which includes everything needed to mount and install the engine. A basic instruments package is also available, which includes all the required engine and flight instruments.
Other popular custom engine installations include Subaru automotive conversions, Jabiru engines, Continental engines, and more.
|
|||||||||||||||||||
|
|
© Zenith Aircraft Company: 2008-09-10 |
|||||||||||||||||||