| ZENITH AIRCRAFT KIT ASSEMBLY |
Getting Started
Using Your Tools Effectively
Following are useful tips and techniques on using your
tools efficiently and effectively in assembling a Zenith Aircraft kit:
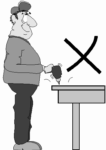
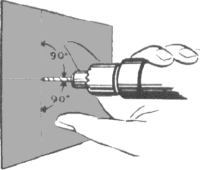
 DRILLING - hold the hand drill
perpendicular to the material being drilled. Always keep drill-bits sharp (minimizes
de-burring). Make sure that you are drilling the hole the proper size (verify drawings),
and correct location. Balance the drill with both hands so that you have full control of
the drill (avoiding "wandering" of the drill). Don't drill the same hole over
more than required, as that will increase the size of the hole. You don't need to
center-punch where you will drill - a well marked spot will suffice. Adding a rubber
washer by the shank will prevent damaging the material as you drill a hole through.
DRILLING - hold the hand drill
perpendicular to the material being drilled. Always keep drill-bits sharp (minimizes
de-burring). Make sure that you are drilling the hole the proper size (verify drawings),
and correct location. Balance the drill with both hands so that you have full control of
the drill (avoiding "wandering" of the drill). Don't drill the same hole over
more than required, as that will increase the size of the hole. You don't need to
center-punch where you will drill - a well marked spot will suffice. Adding a rubber
washer by the shank will prevent damaging the material as you drill a hole through.
BLIND (or PULL) RIVETING: The blind rivets are set with a
standard hand riveter, with customized heads (nose bushings piece). The Zenith
blind rivets
are very easy to set, and require access from one side only (compared to solid rivets
which require access from both sides). Hold the hand riveter perpendicular to the
material as you pull a rivet, pushing down on the riveter (against the material) as you
squeeze. Make sure material is de-burred before riveting (all surfaces, both sides). No
solid (conventional) riveting is required in the kit assembly.
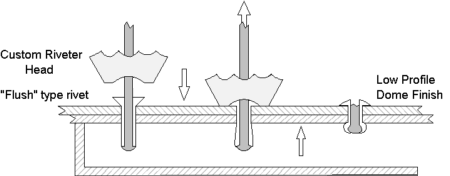
A rivet can always be taken out: To drill out an existing
rivet, drill out the rivet head without drilling through the hole. Then, using a nail,
hammer the stem of the rivet out of the hole. This will not enlarge the rivet hole.
When there is a choice, the rivet head should be located on
the side of the thinnest material riveted together, or on the outside of the aircraft.
There is no need to flush rivet.
SNIPS - HOW TO CUT AND TRIM SHEET METAL: Some
sheet-metal parts need trimming, which is easily done with hand snips. Cutting is made
easier by holding the snips at a slight angle to the material, and not closing the snips
completely (only 1/2 to 3/4 of the scissor blade length). When cutting away a larger
section, it's often easier to first make a rough cut (about 1/2" from final cut), and
then making the final cut. The cut edge may be filed for smoothness, if required.
DE-BURRING / FILING: Parts often need to be
de-burred after having been drilled or cut. Any burrs between two surfaces or along edges
must be removed. The easiest way to remove a burr from a drilled hole is to use a large
drill bit (+1/4"), and turn it by hand a few times in the smaller hole so that it
removes the burr. Note: Make sure that only the burr in removed, and that you do not
enlarge or "countersink" the hole. Do Not Use A Power Drill For This. You
can also lightly pass over the holes with a flat file to remove the burrs (be careful not
to scratch the material).

For sheet metal edges, use a smooth file, running it
lightly along the edge at an angle. Run your hand lightly along edges and over drilled
holes to feel for burrs. Sharp edges may be very lightly filed to avoid cuts. For filing
away larger sections, you can first use a coarser double-cut file. For final filing, use a
smooth file and make sure that a files section does not become "corrugated" from
filing. Tool supply shops also have specialized de-burring tools available (for drilled
holes and sheet metal edges). These are not required, but you may find them useful.
KIT MATERIALS
Only quality materials are used in Zenith Aircraft Company
kits. Structural materials supplied in the kit must meet Zenith Aircraft Company's strict
requirements, and have been subject to numerous quality control tests. The parts supplied
in the kit are professionally pre-formed at the factory so that the builder can begin
assembly immediately, without special tools or jigs. The aircraft has been engineered to
use these specific materials:
The aircraft is built primarily of quality aviation
aluminum-alloy sheet metal. The 6061-T6 aluminum alloy provide high strength,
flexibility and corrosion resistance. Generally, in the instructions the sheet-metal is
only referenced by thickness (ie. .025, .016)
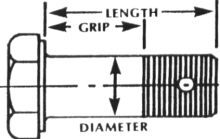
 ZENITH
BLIND
RIVETS: The Zenith blind rivets are made from quality alloys, and are batch tested by
Zenith Aircraft Company for shear strength before being shipped. These rivets are
corrosion resistant, and the stem becomes locked in after being set. Also, not many
different lengths are required for different diameters or thicknesses. In the Assembly
Instructions, they are designated as A4 (1/8) and A5 (5/32). They have a
design shear strength of 130 lbs. and 220 lbs. respectively. Use only Zenith rivets supplied
with the kit.
ZENITH
BLIND
RIVETS: The Zenith blind rivets are made from quality alloys, and are batch tested by
Zenith Aircraft Company for shear strength before being shipped. These rivets are
corrosion resistant, and the stem becomes locked in after being set. Also, not many
different lengths are required for different diameters or thicknesses. In the Assembly
Instructions, they are designated as A4 (1/8) and A5 (5/32). They have a
design shear strength of 130 lbs. and 220 lbs. respectively. Use only Zenith rivets supplied
with the kit.